Hello All
We are going to see , how to implement Certificate Based Authentication[CBA] for Exchange online power shell connect
What is CBA
Certificate-based Authentication (CBA) uses a digital certificate, acquired via cryptography, to identify a user, machine or device before granting access to a network, application or other resource. In our case, the resource is exchange-online powershell
why we need CBA
In the past, unattended sign in required you to store the username and password in a local file or in a secret vault that's accessed at run-time. But, as we all know, storing user credentials locally is not a good security practice
Certificate based authentication (CBA) or app-only authentication as described in this article supports unattended script and automation scenarios by using Azure AD apps and self-signed certificates.
How does it work?
The Exchange Online PowerShell module uses the Active Directory Authentication Library to fetch an app-only token using the application Id, tenant Id (organization), and certificate thumbprint. The application object provisioned inside Azure AD has a Directory Role assigned to it, which is returned in the access token. The session's role based access control (RBAC) is configured using the directory role information that's available in the token.
Let us start , the implenetation Procress
Go to Azure Ad portal Https://azad.cmd.ms/
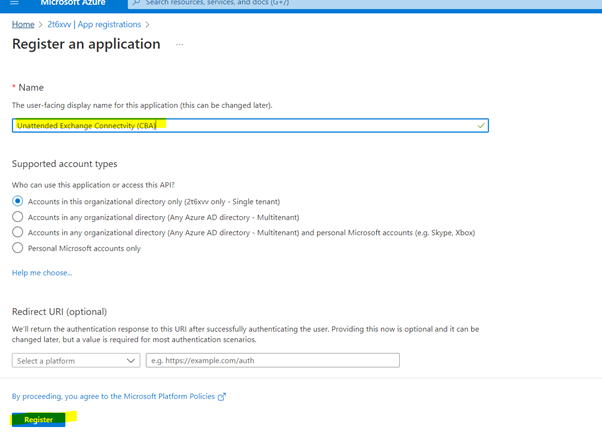
Click on App registration - > New Registration
Register a app in Azure AD
Name the application as you wish and click register
Next we need to give the permission and grant admin consent
Click on API Permission and Add a permission
In the next page, Click API my Org and Search for exchange
Select Office365 for Exchange Online
In the Next page, ---> Click Application Permission --->Drag down a little and select Exchange.ManageasAPP from Exchange Menu
Now its time to grant Permission for the app ( Exchange.ManageasApp)
Select the app and Grant a admin consent
Click Yes in the next section
Now, the next section is to create certificate [self signed ] and upload in Azure App registration
Before going this section , we need to run few powershell commands to create a new certificate
$newcertsplat = @{
DnsName = "2t6xvv.onmicrosoft.com"
CertStoreLocation = 'Cert:\currentuser\my'
Notafter = (get-date).addyears(1)
KeySpec = 'KeyExchange'
}
$mycert = new-selfsignedCertificate @newcertsplat
#export Certifcate to .Pfx
$exportcertsplat = @ {
Filepath = 'ExoCert.Pfx'
Password = $(convertto-SecureString -string "cloudmon@123" -AsplainText -Force)
}
$mycert | Export-certificate -filepath Exocert.cer
Once the certificate is available in your local PC after the above line's are executed
Note : by default the certificate is stored in your folder where you executed
i ran in my default : "C:\Users\ramki "
Go back to Azure AD --> App Registration --> select your apps --> Certificate and Secret
Click on Certificate and upload the certificate
Now we need to assign the Exchange administrator roles for this application.
Go to Azure Active Directory once again - Click roles and Administrations
Search for exchange administrator role
Add Assignments
In a Select the member page -->select the apps which we created for the purpose
Give the justification and assign it
cross verify it, whether the app is actively assigned in Active Assignment menu
That's it, All the configuration setup has completed and Its time to execute the exchange online powershell, for which we need to obtain the app ID from app registration
Copy the app id and execute the powershell commands below
$connectsplat =@{
Certificatefilepath = "C:\Users\ramki\exocert_01.pfx"
CertificatePassword = $(convertto-SecureString -string "cloudmon@123" -AsplainText -Force)
Appid = ''
Organization = "2t6xvv.onmicrosoft.com"
}
Connect-ExchangeOnline @connectsplat
As i said in the beginning of this topic , this would be help in the scenario or replace, on which our exchange online scripts are using any stored username and password in a local file for unattended sign in required


Comments
Post a Comment